| Suzuki Sidekicks & Geo Trackers, only 1992 to 1998. 16 valve or the Tracker VIN code "6" See The full distributor installation steps are here, if it was removed from the HEAD: If your motor is G16A, or 8 valves? then , Go back one page to find the 8v procedure. The page is long, because of all the was ways to mess up or if distributor was removed.
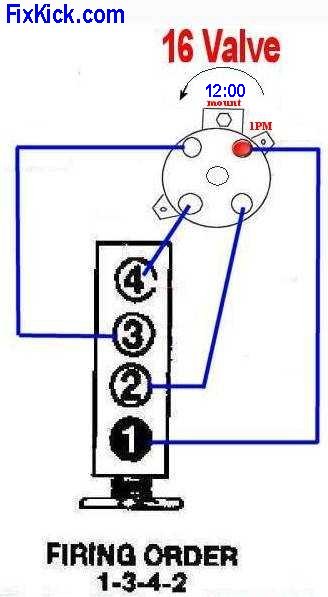
The Distributor (dizzy) rotor needs to be at 1pm at TDC. The firing order is 1,3,4,2 CCW dizzy rotation it is, unlike 8v rotation. (and not like lies in most books) Counter Clock Wise it is. Please time the cam using #4 marks. Please time the distributor using #1 marks. I will not cover, timing the distributor to #4 nor the funny firing order 4,2,1,3 CCW. no mad previous owners, no slipped timing belts, (we do this, after every tune up, a fast check) Assumptions here? A fast fine adjustment list. (assumes crank pulley is clean and the timing belt cover scale is clean too.) All accessories OFF, (no head lights, no A/C , no blower, no radios or amps, no rear defrost; only engine running, NOTHING ELSE) 1: Hot motor (180f degrees minimum) running at proper idle speed. 2: Connect an ignition timing Strobe light to the #1 spark HV lead. (mid HV wire span is best) 3: Idle at 800 RPM (if not set it now) (TB idle bleed screw) 4: Set the Freeze jumper. (paper clip) conn. just in front of battery or near right front head light 1996+, Early Suzuki uses 4 pin DLC and 6, I've no idea what you have now. At these Jumper pins 4 to 5 6pin DLC, or C to D on 4pin DLC. as your case my be. If the freeze fails read this. (called timing bounce) Check timing?, now at 800 RPM (+/- 50 rpm) per below: 5: Point the Strobe at the timing scale see it at, or adjust it to, 5 Degree's Before TDC (left side of zero scale mark) see under hood ("sticker" for factory spec on timing.if just tad off (1deg?) adjust distributor base, if way off (a mad PO?) the timing belt has slipped, if true, do not touch distributor and do the cam belt first. Hint, that hood sticker timing is different in different countries, our G16B uses 5°BTDC (fed) and 8°BTDC in CALIFORNIA. so why not read your hood sticker first.? Loosen the distributor base bolt and set the timing to the left of 0, advanced per YOUR sticker spec. If the timing bounces, that is wrong, with the freeze jumper in place , there are 9 causes for that failure.The 60k tune up, schedule states when to change the Cam belt, avoid skipping this service point and avoid being stranded. If discovered "like magic" ignition timing is way off?, do the Tbelt sneak-a-peek check. if spark timing is off and he cam belt is timed right then do the full dizzy timing procedure, someone hacked up your timing,. This pages assumes you know how to use a strobe type ignition timing light, and that you know , the Dizzy spins Counter clock wise and the crank spins Clock wise (looking at pulley) (non believer? crank and look, behold!) And that the marks, are clear. Myths: The 16v dizzy turns Clockwise, WRONG !, Most GM and Auto store book (rags) show this and is dead WRONG. Many (most) books show the dizzy turning the wrong way, they lied. it turns CCW, watch the rotor cranking. All Suzuki books, in print get this CORRECT. SPEC: Here are the timing specifications page based on your options and year or in California cars. FACT: The Firing order, is 1,3,4,2 (CCW) ! #1 spark plug is the front of the car, Do no listen to myths or store bought RAGS. The store bought books, try to cover 10 years, and 3 engine and mix up all the facts in a toxic soup. this page covers only the 16v . The 8v Dizzy spins opposite to any 16v. That is their failing. In 1996 the engine got a new Dizzy (spark coil inside) and a new crank sensor. (the later makes spark way more accurate) Rule 1: Always replace the spark plug wires. 1 at a time. This page is long , due to all the ways, to mess up, in reality, it only takes 5 min
to do timing. (point strobe ,twist dizzy, lock it down)
Prerequisites: The Crank shaft to cam timing is first , never last. IF your cam timing belt slipped , snapped or stripped (they do just after 60k miles) or the keys sheared, then you must correct that first. or ? If your car runs pretty good, then jump to the FINE TUNE procedure , HERE. There are 2 timing procedures. Coarse, sometimes called Static and then the fine tuned dynamic method. The worse case method is , install the Distributor physically, and clamp it down using the coarse section below. The coarse adjustment will be about 5 degrees ± accurate when done , and the car will start and run fine. Later, you get a timing light and set the dynamic timing exactly. Preliminary step: Attach the Cap to the Distributor body. look at the mount clamp hole on the body and position it to 12pm, then notice the first cap tower is at 1PM . Put a mark on the cap in line with this position,down to the aluminum body and not mark the body. The Distributor body now has a #1 mark. This can be done distributor on the car or off the car; it don't matter at all. The coarse adjustment: ( the adjustment done ,before the final final fine timing procedure.) We do this after Dizzy or head removal. Also Know as STATIC timing adjustment: Coarse is by hand and eyeball, dynamic is with a strobe light. Consider replacing both the Distributor O-Rings on all high mileage Kicks, before doing this procedure, using Silicone grease. ( or leaks will happen) The Main Housing to the Head O-ring , loves , to crack and then leak oil all over the back of the engine and down to the exhaust pipe. WARNING:If you are reading this, to find out how to time your Distributor and the previous owner, set the timing with the Distributor gears set to a non- standard position, and you do not wish to start from scratch , per below then , you must put the crank to TDC #1 firing and then pull the cap and write down where this last person timed your engine. WHERE IS #1 wire? mark this point on the Distributor body. If you do not do this, you will never get the engine to run, if you mix up the HV spark wires. If you do not heed this advice above, then you have only 2 choices, discover what this person did?, or follow my procedure below. My procedure below is the OEM FSM method. (by the book). Please use this method. There are 4 high voltage wires, you can in fact time the engine 4 different ways, but please do it the correct OEM way. New or replacing the HV spark wires? Replace them one at time. (or mark the cap first) if not ?, you will have pain. A running engine:If you are just replacing cap or wires , then just swap one wire at a time or mark every cap port and each wire with a tag. 1 , 2, 3, ..... Done ! Best is marking everything, for most Distributor work, on a running motor and pre tear down! FINDING #1 TDC?: Set the Crank to TDC 0 deg. Cam at TDC #1 cylinder Valve lifters all loose (valves closed fully). #1 cylinder is the front cylinder ! (blow air into #1 cylinder spark plug hole with any new rubber tube with lips, if you can't blow, then the valves are closed.) The same trick can be done with a cylinder compression gauge. < OEM style.
If valve cover is off , just look at the valves, 4 loose lifters indicates 4 valves closed.
If not , then the below works every time 100% HV= High Voltage wires If Distributor was not ever completely removed, then jump to step 16. ALL STEPS Static timing.: (worse case, Valve Cover attached) (all steps if Distributor was removed or some removed or spun it wildly ]
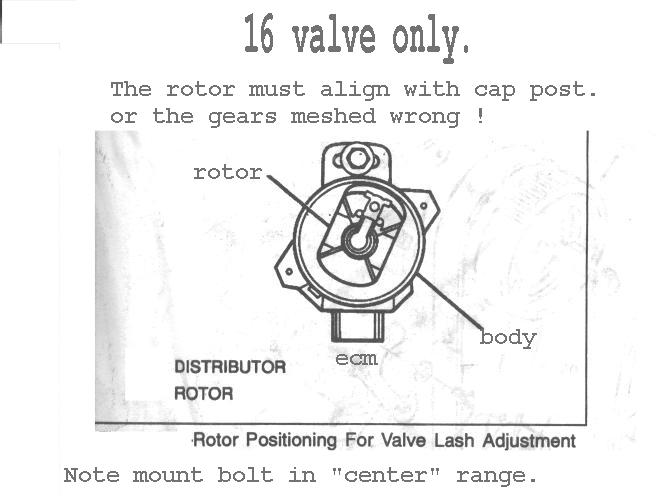
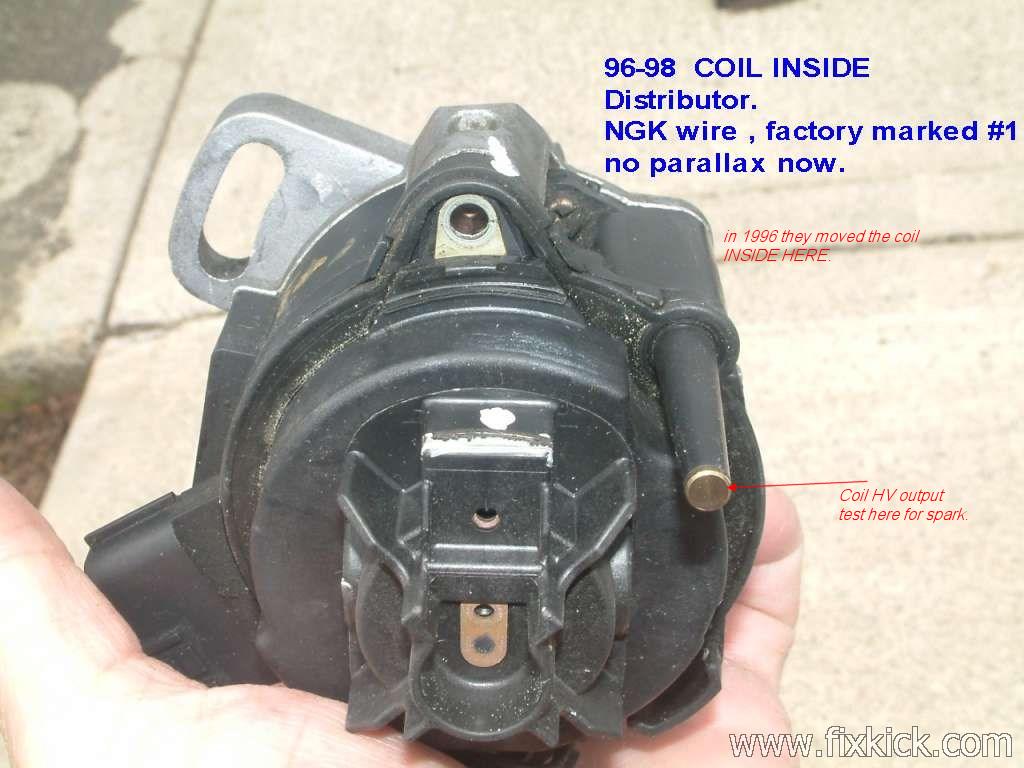
FSM Dizzy position lost. chapter 6D4-7. Watch out for FSM chapter 8 showing rotor going backwards. Way to go, GM, and Haynes! 16-Valve Engine Wire lay out. Lay down the wires , exactly like shown. << OEM way ! The 16v engine rotates the Distributor Counter clock wise directions , see the photo ? Below ? Go back one page to find the 8v procedure So laying down the wires correctly is important, and the firing order is 1,3,4,2. The Proper Ignition Setup. Not shown wrong , like so many books. Clamp bolt is straight up on 16v engine . The Clamp bolt is the most important , reference point. Drawing 1: The truth, unlike the lies shown in most books (non Suzuki books)  If you did the procedure correct above, the car will start. (good motor , cam timed correct and good compression) If not, check your work carefully. Best is to put the cap back on, mark #1 , HV tower lug on the base, for more easy alignment. Don't forget the timing light works key on cranking, and fuel pump relay removed to cut fuel and set Photo#1 Really nice HR photo , Thanks again JIM! Again, OEM , 1PM locations TDC #1 firing. FYI :CAM COG, "E" spoke mark is at 6pm , means #1 firing, This photo below is a crude FSM photo, The only important issue is marking the base with # 1 location ( Like Here 1, and Here 2 , and last Here 3) First mark the #1 tower , then the base of tower then the inside of base. I'm using Liquid paper ! Drawing 2, not a GM wrong drawing. The rotor turns CCW. "counter clock wise" ! This real drawing is #1 firing, By Suzuki.  96-98 actual distributor (97 in hand) and my index marks in white. Note reality is slightly different than the above FSM Go back one page to find the 8v procedure photo. (side connector location , actual) The base MOUNT is 12 O-clock. that is our reference point. The below is 1996-98. note the coil HV lug, ! its timed the same way as 92-95 distributors. see my #1 markes in white, I used the cap fitted to find those. The 96 has the side connector moved... Photo2:  The distributor can be timed to any of the 4 High voltage tower posts and run great. but the firing order is 4,2,1,3 and that confuses the heck out of folks, why do that? But only the above is the OEM way. The harness binds up, in most the wrong ways, so.... If you want to time it to 11pm, 4pm or 7pm , have at it. But don't expect help from others. (or later usage of same in any FSM) I see many timed at 11pm. (due to mechanics that follow the 8v books or non OEM manuals, speculation or worse follow any Auto store Rags (book of lies) book) THE FINE TIMING SETTING Procedure: Also Known as Dynamic timing ,using a STROBE light. The engine now runs , so now we adjust the timing for perfection.You need an electronic strobe timing light. (beg, buy , barrow or rent one). Before connecting your timing light: (examine spec. values, there are 2 timing values for different years) Place the DLC Ignition FREEZE jumper. If the timing will not freeze the EFI is either IN LIMPHOME mode or the throttle TPS idle switch is stuck open (calibrate it) The timing must not bounce if it does repair the causation of Limphome or correct the below pre-conditions.
Clamp the Timing light ,inductive clip to #1 spark plug HV cable. (the spark wire, #1 is front). Using a electronic timing light set your timing by moving the Distributor base just a tad. Set it to the mfg , specifications. Again, if the timing wiggles by itself , the ECU diagnostic jumper in front of the battery has the jumper set WRONG !!! or other input to ECU is wrong.
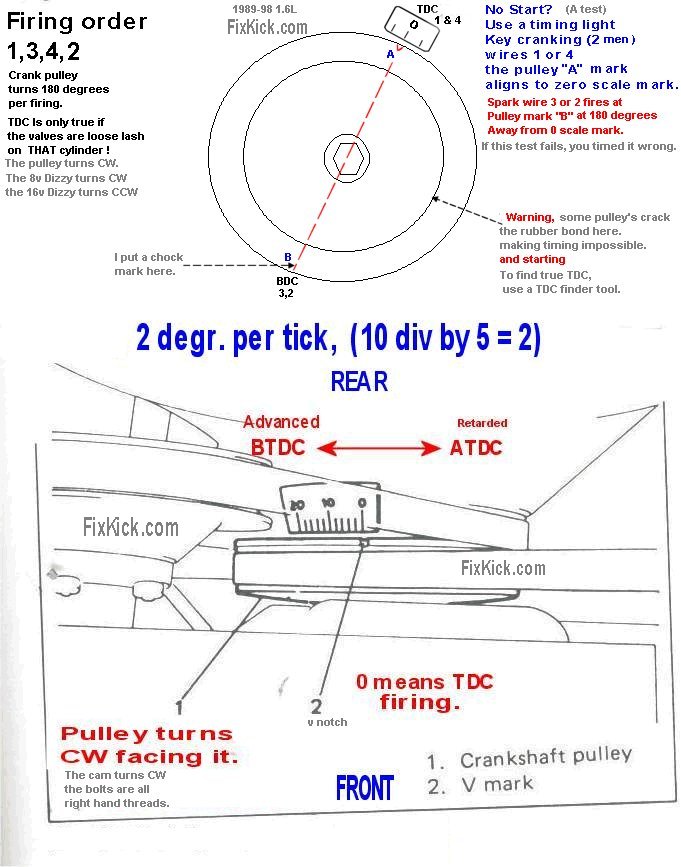
Specification History: Timing is 8 deg. BTDC ( before top dead center) [ early Kicks ]In 1996 the Timing dropped to 5 Deg. BTDC, up to year 2000. RPM is 750- 850 starting in 1996 to 1998 RPM is 700-800 1999 to 2000 BTDC = Before Top Dead Center (firing, NOT exhausting ) The photo below is with the CRANK at TDC 0 degrees and on the Firing stroke and not the Exhaust stroke. The Freeze Jumper does not work correctly, my timing keeps jumping (bouncing) like crazy. Why? First thing to know is the bounce is normal on all 1991 to today cars, it bounces for the fact that the ECU moves advance even at idle, and for low smog, low fuel uses and to fine tune idle speeds,. Normal, so to set timing you need a freeze jumper planted, (Suzuki uses an other name, but freeze is clearer) Do not panic. The Nine ways to fail freeze, not counting the 1st rule on timing, steps above, all accessories are OFF, The problem is real and common, the ECU sees a major fault. The following failures will cause this problem: In ORDER.
anything ever, on demand and is not the silly nag switch set wrong. Backup mode is DEAD ECU... Failsafe is usually the ECU sensors inputs dead. not ECU bad. The ECU will show DTCs for gross sensor input errors. The Marks on all 1.6L motors look like the below. Drawing 3: One more TDC view: When cranking motor , using the strobe the light falls for each wire connected, (mag pickup) per the below. If not?, it's timed all wrong. (proof in pudding) If the crank key (shears) slips, all marks, on this page are 100% worthless and just whistling in the dark , only a true TDC finder can solve that riddle. Drawing 4:  Fast Dizzy planting 16v. 1992 to 1998 USA spec. cars. (firing order is 1,3,4,2 on all 4 cylinder kicks , #1 is front) There are 4 ways to time the distributor, the below is the FACTORY way. (all 4 ways work, but I'm not covering all ways) You are here, because all timing was lost, for the Dizzy (Distributor) Factoid 1: The engine fires every 180 degrees of crank rotation. CW is normal rotation facing rear of car. CW means CLOCK WISE. This section, is a short version of this: (the below, is short, as is possible)
you can remove spark plug #1 and blow into #1 and if can't blow, it's firing on #1 (the blow test ) Yes, use a CLEAN hose and lips to do that. The Gorky way (engine more taken apart) "if the cam cover is off, put the cam E spoke, mark down, at 6pm and crank mark at TDC 0 mark. This is #1 firing now. E mark up is #4 firing not #1 Assumptions: (PO = Previous Owners) PIT FALL HELL:
RELATED: O-Ring data: see dizzy Oring sources and part numbers here. rev.=19, 4/29/2013 , All Text/html , COPYRIGHT © 2007- 1/7/2016 , FixKick.com | |
| : |
Rabu, 06 Januari 2016
Home »
Knowledge
,
Ves Community Chapter Batam
» How to time the distributor G16B, ( slang: DIZZY ! )


0 comments:
Posting Komentar