16
valve 1.6 Liter, Sidekick Timing belt swap:
USA engines 1992 to 2000' The USA
Vitara dropped G16b in 2001.
The below applies to factory stock (OE spec)
motors and cams, only in (N. America)
The Valve cover can STAY ON ! (but is
not advised) It's good to look at cam action.
The crank cog can Stay on, but
is but is always (1st time) to look use the new
TSB for
Torque.The GM book has gross errors. see that
here.
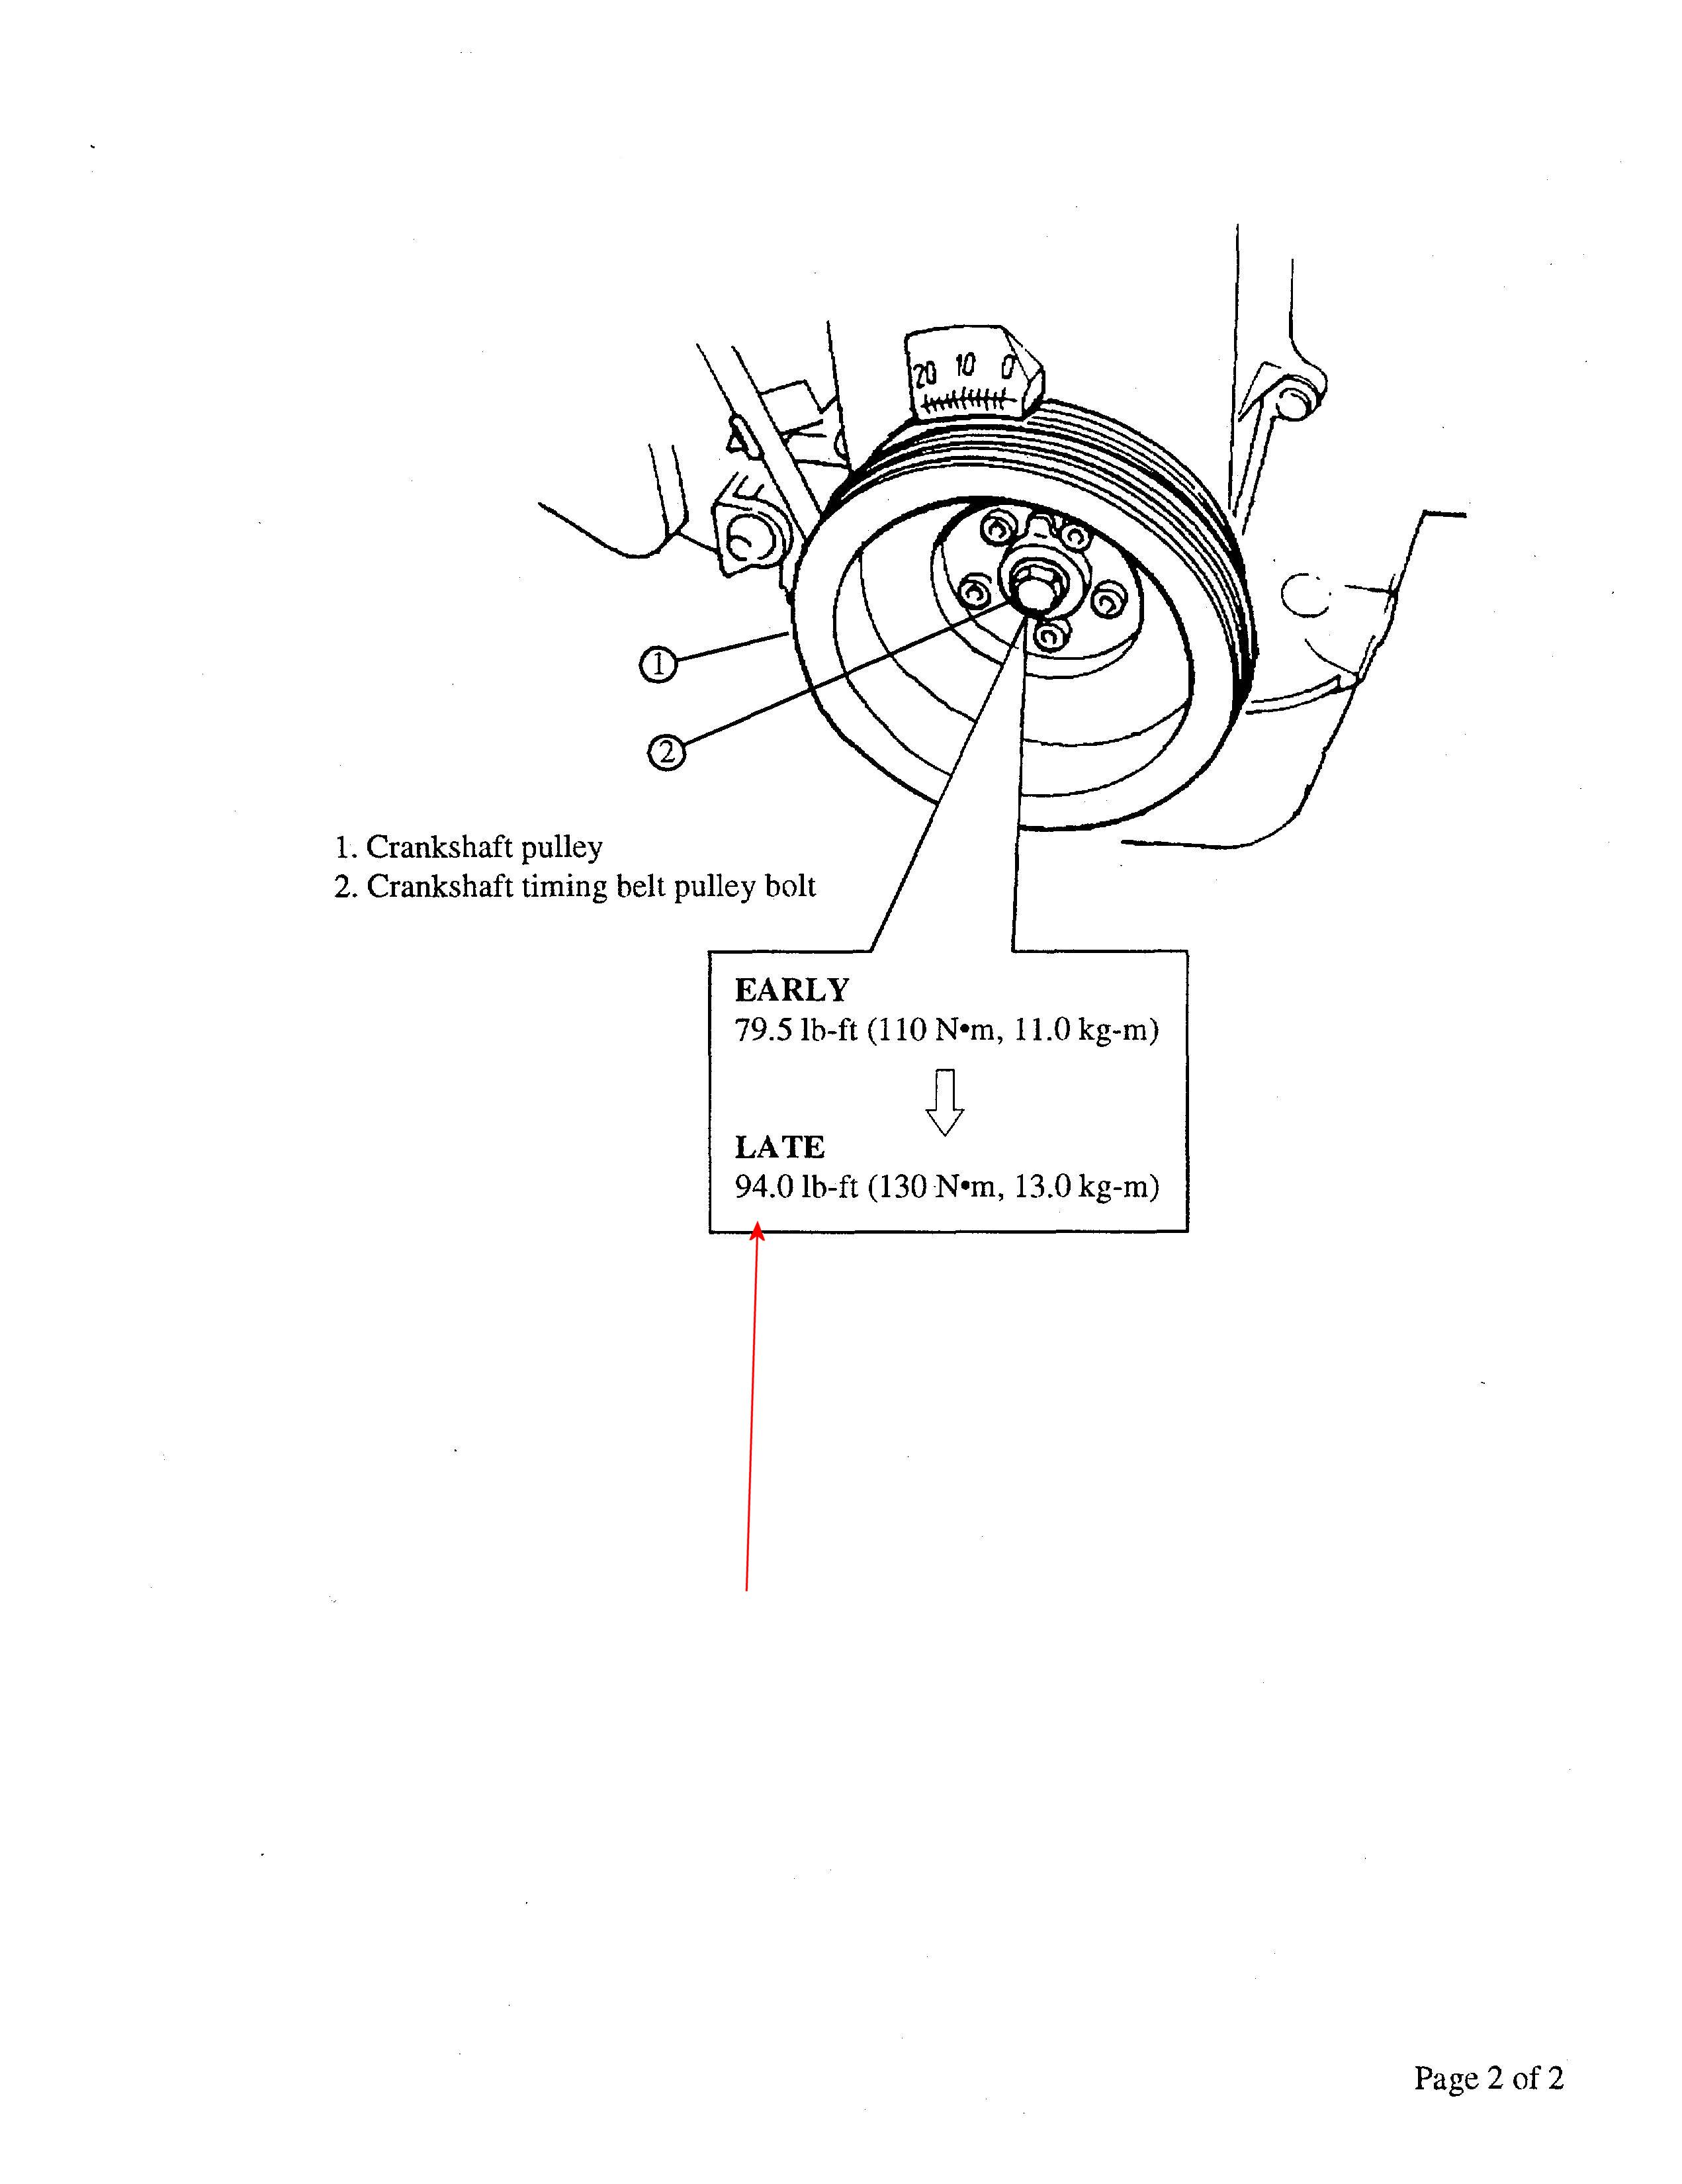
The torque settings are here.
do not use GM settings, see errata at the end.(
See 6mm warnings and non ISO Suzuki pulley
bolts)
I write this page not
knowing why you are here (normal 60k belt swap) or the engine
died?THE ACID test and the sneak-a-peek checks.
NEVER
TIME the CAM at TDC # 1 cylinder firing ( forget that IDEA?)
This
cam is timed at #4 firing ! NOT #1 ! READ THE real FSM carefully
or mine below) Click to
zoom Click to
zoom  Ouch, click to
zoom Ouch, click to
zoom
My Opinion:
Most non OEM published
procedures are flawed, they assume too
many things, like the belt is not slipped or the distributor was timed correctly. Motor good., etc.
Most
generic store bought manuals get many facts wrong. I call them Rags, as that
is all they are good for, is to mop up spills. (they have great warnings and
safety! topics)
Most books assume there are no
failures.
Many store bought manuals (Rags) do not even consider, you have
a new cam, new head/block or head gasket. (HOW CAN THIS BE ?)
Nor do they
consider , bad maintenance or bad motor, or other
failures.
Some use the Distributor as a
refrence point to setting the cam, This can cause great troubles. Don't
look at the Disributor , leave that for LAST.
FSM =
Factory Service Manual. (only GM and Suzuki publish these) {ebay has
them used, dirt cheap ,get one for about $28 used}
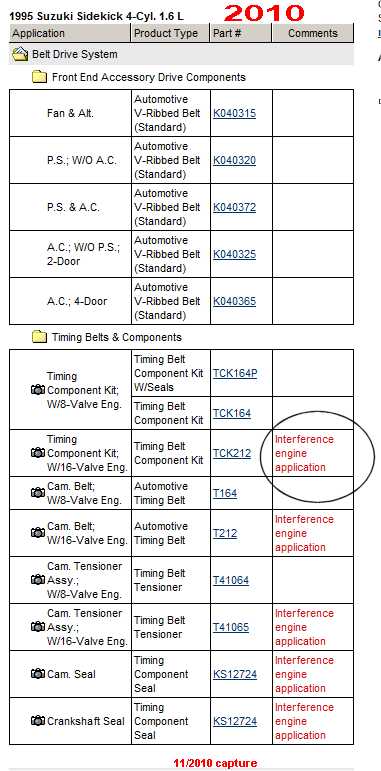
Replace the Timing belt ,
Idler and water pump. (at least)
Some like to change the seals ( I don't if ,
it don't leak)
Changing the crank seal ,USE electricians tape on the shaft to protect
the new seal , you will fail if you dont do
that.
Buy the full GATES kit with idler. Rockauto.com has this kit.
It is very high quality.
The Gates kit
DISCOUNT$ the idler !
The idler by itself is very
expensive.
The actual FSM 4 pages with annotations by me.
The FULL 96 FSM is also here.
See chapter 6A
Jargon :A/T is Automatic transmission, P/S is
power steering, A/C is Air Conditioning, CCW is counter clock wise.
Phase
I:
- Pull battery Minus
cable and hide the IGNITION keys. 1st !
- Remove all spark plugs.
(first, blow out the spark wells and check dirt, get the wells clean )
oil here is a bad Valve gasket set .
- Drain Radiator at bottom left (drivers perspective) tank. (take off the RAD
Cap to help , after full cooling of motor)
- Remove the fan stud nuts and then remove shroud and fan at 1 assembly.
- Consider removing radiator (harder on A/T
cars or A/C opted cars) . On Automatic, radiator can just be left
installed, but slows the job.
- It may be possible to tilt the radiator by loosening all mounts, associated with it, to do service
, but I remove the RAD every time.
- Loosen the 3 Alternator bolts/nuts, and swing it inward. (use a spanner on
the lower inboard rear bolt/nut)
- blank
- Remove Alternator V-belt/ Serpentine belt . (an any other belts, that block
the front T-belt cover) P/S , A/C?
- P/S has a hidden bolt , bottom /
front , dead center, through the pulley , use a socket wrench, loosen all bolts
and tilt it, inward. < Skip if A/C car.
- IF A/C opted car, the belt tensioner
was moved to the A/C mount, so. loosen
the A/C compressor. And remove its belt.
- Remove Crank Damper pulley outer ring screws ( by unscrewing the tiny 8mm hex headed bolts around rim)
Allen heads are none stock, if found.
- Remove the T-Belt cover.
Bingo, behold a timing belt, look for and
correct damage, I check timing marks ,and see if the cam timing is off,
and make note of that.
- Attempt to get the "E" Mark on the cam cog to 12pm, and crank to TDC NOW!.
if the valves hit , try moving both gently CW or CCW to get timed..
- Turn the 17mm bottom bolt by hand using hand tools. Never the starter, or
a huge breaker bar. (feel it)
- Go to Phase II:
Note that
in step 12 above, those 8mm heads are NON ISO
bolts. Custom Suzuki hex bolts , Do not
use 10mm headed bolts or they will jam (screw)If
the valves hit when hand turning shafts, and all motor problems are corrected
(sheared keys?) then panic and loosen the rocker arm lash adjusters , all
16.
PHASE II. (If replacing
crank seal do #4 )
- Loosen & remove the timing belt
IDLER center tensioner bolt. and associated parts.
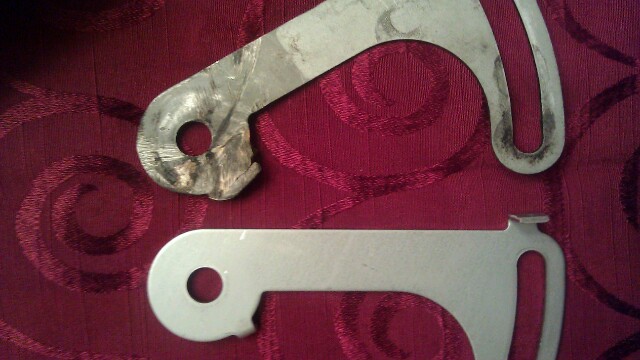
- Loosen the spring stud bolt. (test this device idler plate, for being free
to move and no binding after loosening it.)
- Wiggle all parts there, till loose and take off belt and spring. ( as
necessary).
- Optional Remove the center 17mm large crank COG bolt and
wheel and inspect the key way ! This is
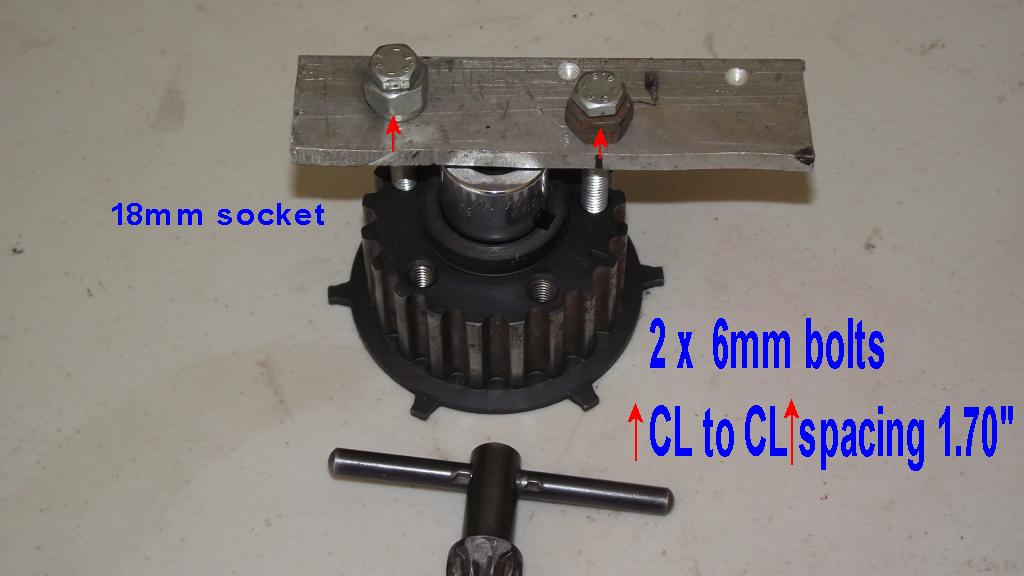
optional, and 1st time I do this. The tool I
made, is here.
- If the key way is damaged , you need to stop now and seek expert
help. You have a serious problem.
- Removing this large 17mm bolt , requires, 5th gear
(if 5sp) or a flywheel lock or a front cog locking
bar (the latter is easy to make see notes below)
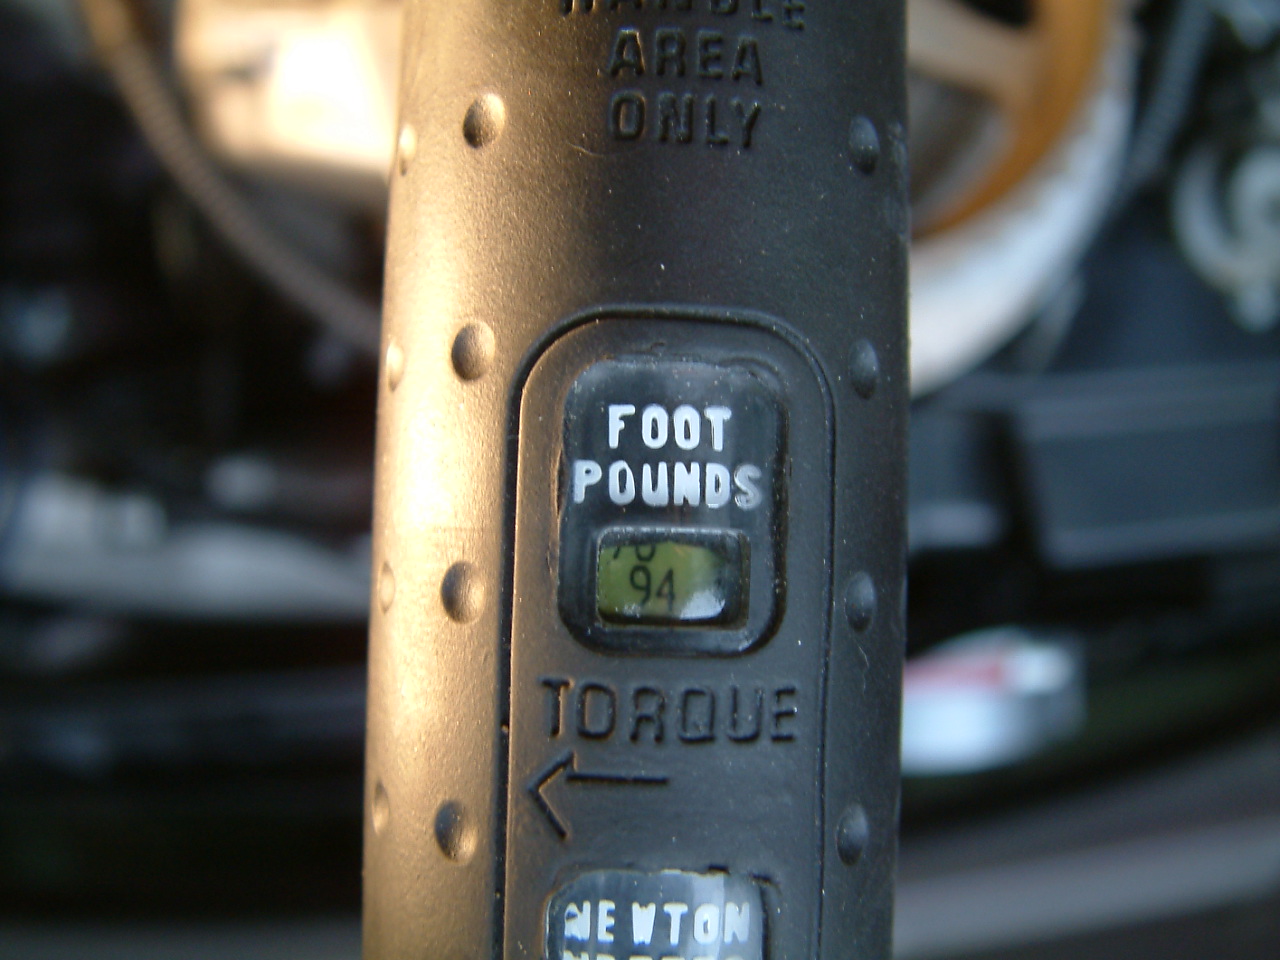
- Correct any crank shaft tip damage and put on a new cog and bolt and set the
bolt to 94-Ft/lbs and use loctite on the
dry threads
- blank
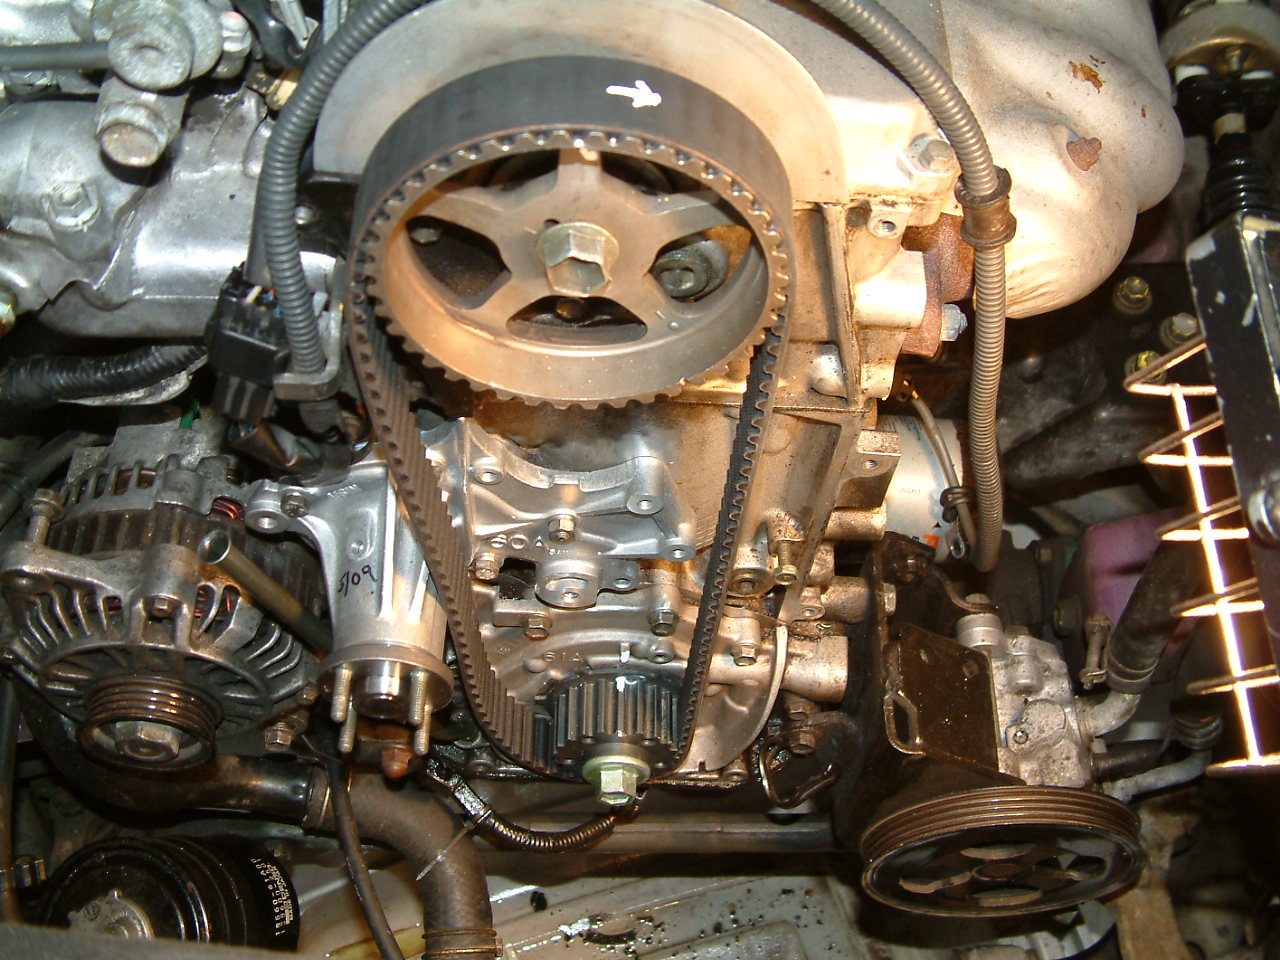
- Align the E mark to 12pm and the crank cog to TDC (see the great photos
below for this alignment)
- Put the new belt back on ,
with the right side (drivers left) of the belt tight , no slack, all slack must
be on the opposite idle pulley side.
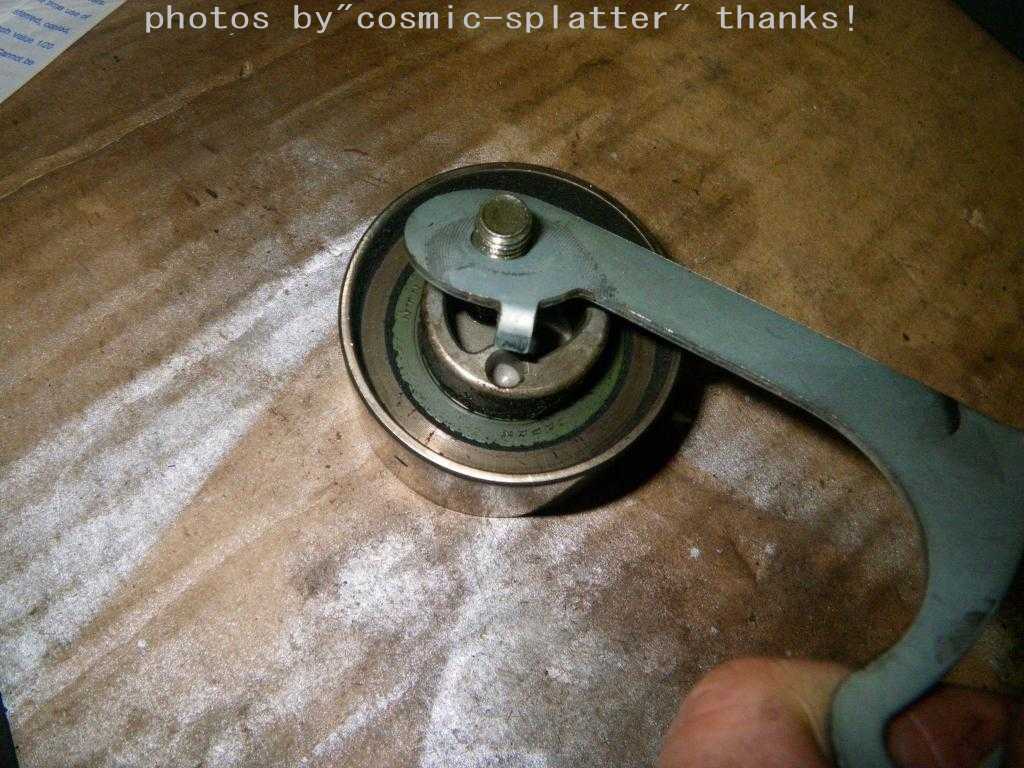
- Warning, the new idler wheel
must be indexed (tab on inside edge) to the idler
ARM, so they INDEX and track TOGETHER smoothly ( or all bets off) Nor Damaged.
- Put back the spring / idler and let the spring take up all slack. now just
set the 2 bolts finger tight, then back off a tad, so spring device barely
floats.
- Make sure the spring plate indexes properly behind the idler bushing (back
side index ) so that spring powers the spring plate. (look careful see
warnng 13 below )
- Check the timing again, with no slack on the right ( left side, for the
drivers perspective) Stud nut and idle bolt 1/2
turn loose.
- If all checks out , rotate the crankshaft 2 Revolutions CW( Clock-Wise
facing rear, at crank big bolt 17mm) , spark plugs removed helps GREATLY !
- The spark plugs are removed , see tiny tension spring device , set the
exact tension on the belt !by the 2 turns
CW ! the tiny sprind DOES ALL THAT.
- This extra steps allow the tiny little TBELT spring , to take out the belt
slack. Once set perfect we lock it down.
- If the timing marks are again perfect , like in step 9 above, then now lock the Idler tensioner bolt and the
spring stud to spec.
- The engine cam is now timed
PERFECTLY. Make sure Idler stud is set to factory torque.
- (I do a validate compression test on
#1 only , in about 5min flat, if failed, repeat the above) and the ACID test here (key ways x2 and marks)
- I then check that the crank is at TDC and in fact the piston is at TDC using my TDC finder page as a guide.
- Reverse the above procedures , (access gained on previous page)
- LAST time the Distributor. use the 16V
section
Warning
13 ?: In step 13
above. the idler base plate has a tang, this tang must be indexed to the idler
base (backside) do not guess, index it, or you will have 2 failures, one it that
the tension step is never going to work (loose belt) and now the idler is
canted, causing belt drifting and hitting cover, a DOUBLE FAIL!
The
below new photo makes this very clear. See that TANG, about to fit in TANG
hole, This is a MUST DO.

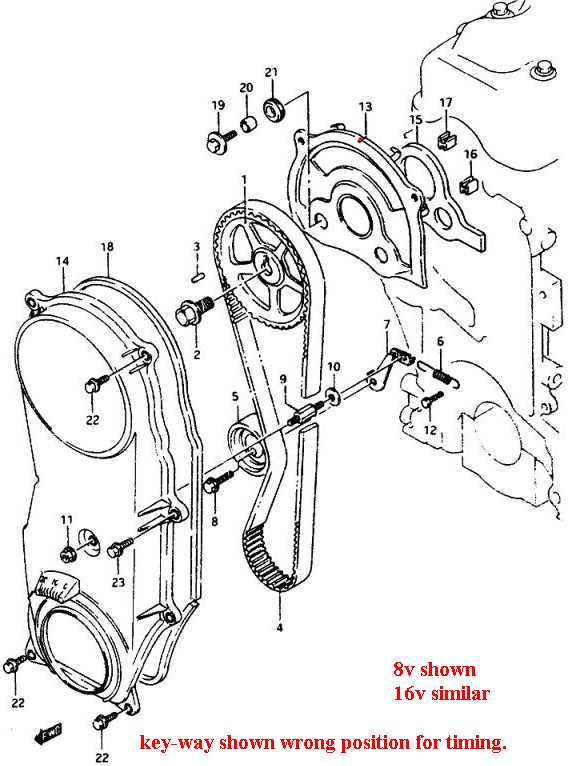
Drawing #1
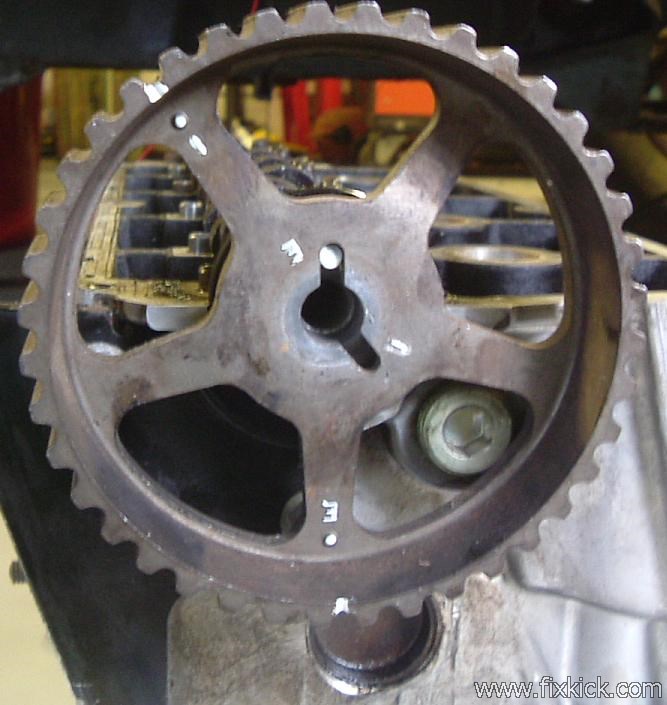
16v Cam Cog gear: Click below to zoom and see real photo.
 < Click to zoom < Click to zoom
Photo 1:
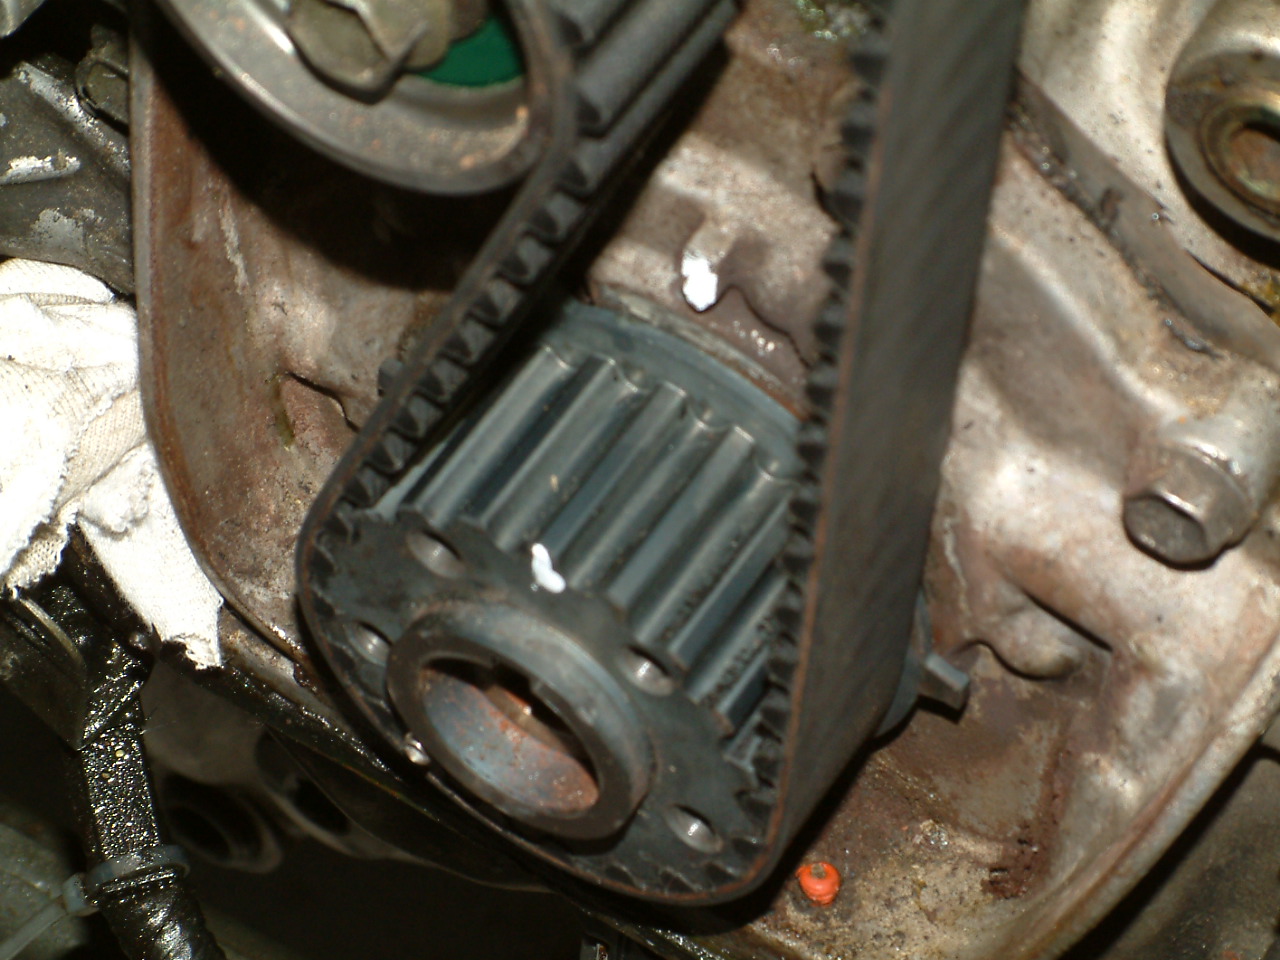
Crank cog gear:
 click to zoom click to zoom
Note the crank key is at 12PM
!!! see it , check CAREFULLY THIS !!!
See that Mark above crank cog , cast into
aluminum oil pump housing. See white mark above cog.?
See that Mark on crank cog itself., see my
white mark here.
Proper tension is critical, it happens by
allowing the spring on the idler to press on belt with the pulley.
The key
here is all tension comes from that tiny spring. (on the facing belt left
side). Never tension a
timing belt like an accessory Serpentine belt.
If you decided to
remove the cam cog wheel , you will see that "the key way is at 6pm, "E" the
"I" key slow it WRONG !
This Cam wheel MUST be set correctly , do not proceed
until it is correct.
There are false marks
do no use any false marks.
Keep in mind that spring only works
before the lock down , setting the exact tension, the spring is now useless until the next 60k
swap.
Note1: the 17mm bolt must be torqued to 94
lbs/ft ,and this can be done, 4 ways.
1: 5th gear , rear wheels chocked
in 4wd High. Manual Tranny. Works perfect for me. with 5 speed.
2: AT-
3sp/4sp, with bottom flywheel pan removed and using a flywheel lock (make one.
buy one) Suzuki sells them. HUGE VISE GRIPS work perfect.
3: Chilton's says,
wrap damper pulley (its back on now) with duct tape and use a chain wrench to
hold the pulley (an ugly procedure, gross way.)
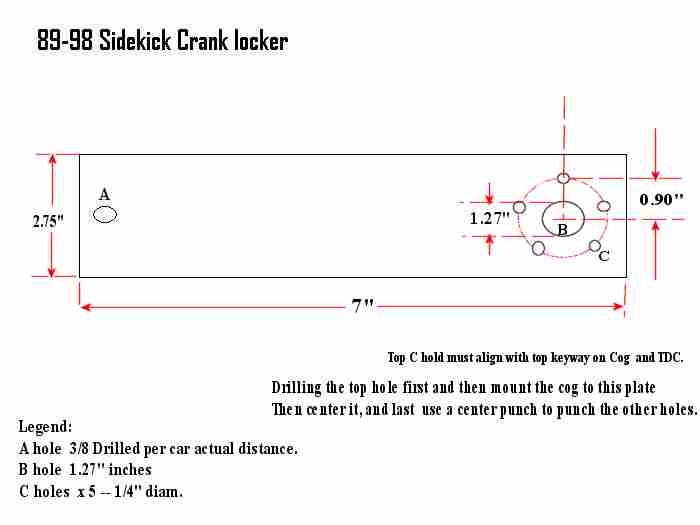
4: My way is pulley off, and
home made crank bottom cog lock , made of angle iron
and attached to , ALT/AC or PS brackets. Drill holes in tool.
Note2:
Please do not rip your cam out or pop
off the belt , just because the Distributor is mis timed. Please don't.
Set
the cam, then set the Distributor , there is no OTHER WAY. ( and surely never
time Distributor and then time cam, as some store rags say to do)
Please
use these steps, as an adjunct to the above linked manuals FSM factory
documents.
There maybe?,
other ways to time an engine, but this page is the FSM way. Feel free to try
those other ways.
OEM SUZUKI
SPEC. WAY!
Special Photos:
A photo of the
16v cam end with false key way and a marks showing which is wrong.
No manual
mentions this fact, that there are 2 slots, ONE IS for G16B and the other is
for a SF-413 DOHC motor.
ONLY USE "E" slots and marks. IGNORE ALL "I" MARKS !!!
Photo
2: The Cam belt is timed at #4 firing ! Just as the Gates belt instructions
clearly state, and FSM. The "E" mark is at 12pm with the crank at
TDC.
 click to see on cam photo. click to see on cam photo.
Cam
shaft key dowel pin down.
E mark UP is the rule G16B, for setting the tension correctly. Ignore
all "I" marks.
SEE the 2 false
marks?, This same exact cog is used on the G13B and K swift engine,
that is a 4 cylinder, twin cam engine, (on the G13 the E means exhaust side, and
I mean intake side)
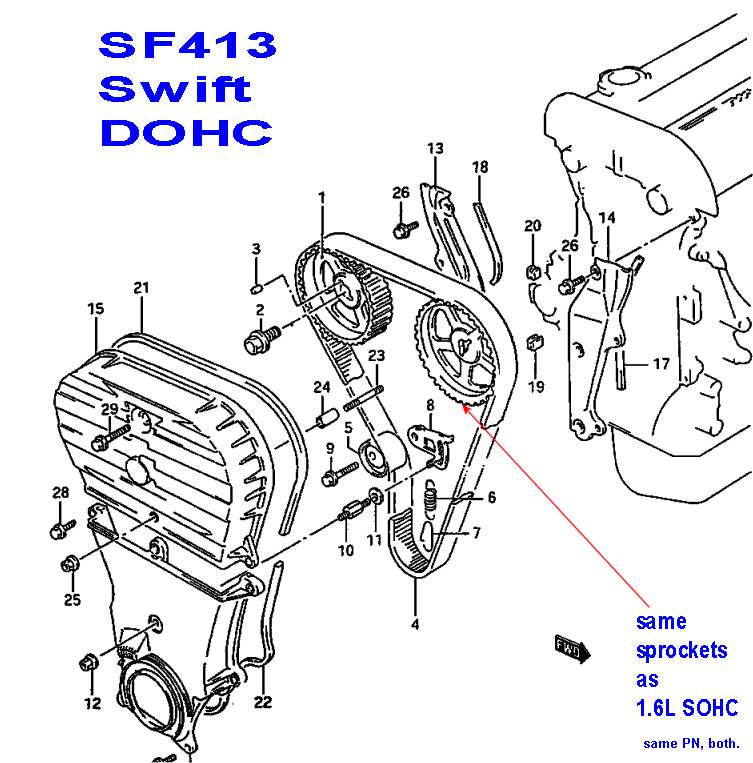
The Suzuki Swift 1.3L
DOHC the real Suzuki name for the Swift is SF413 ! regardless of the other 10
names used world wide. (badge names)
DO NOT
EVER USE either of the "I" MARKS on this G16B 16valve 1.6L SOHC
motor.
Tools and materials: ( outside of full
socket sets metric and deep and shallow and metric spanners)
The only special tool needed is:
A feeler
guage
and a crank shaft locker if car is A/T.
MY lash procedure:
(always LAST)
The below tool is not needed , it is only an
option.
Drawing 2:

This worning shows
up at GATE Rubber here
The belew is in all USA Geo and Suzuki G16B books
publised for this car. YOU DECIDE WHAT IT MEANS !
This
warning is on USA and Canada exported engines, if you live in another country or
have a low-lift [eco]cam then these precautions, may not apply to you. (but that
would be rare!)
These are serious issues, if your car is special or
unique, then by all means , ignore all my warnings , this page is OEM LOCK BOX
STOCK USA SIDEKICKS.
The Below photo
is not for timing CAM. !!! This is for
parts identifications ONLY.
Drawing
3:

1996 GEO TRACKED, 16V. Properly
TIMED ! Look carefully, all secrets are shown here, all 6 Points of Reference
!!! 3 photos.
Photo 3: (see the ACID test
here)
 Click to zoom Click to zoom
Above,
CAM KEY DOWN, "E' MARK UP. Really, can it be more clear ? the above?
Photo
4: (ignore the TONE wheel in years less than 1996)
Photo 5: (minor damage to key) A new cog
stopped the back side hitting !!!

The Realities of bad maintenance: (running
water pumps over 60k miles)
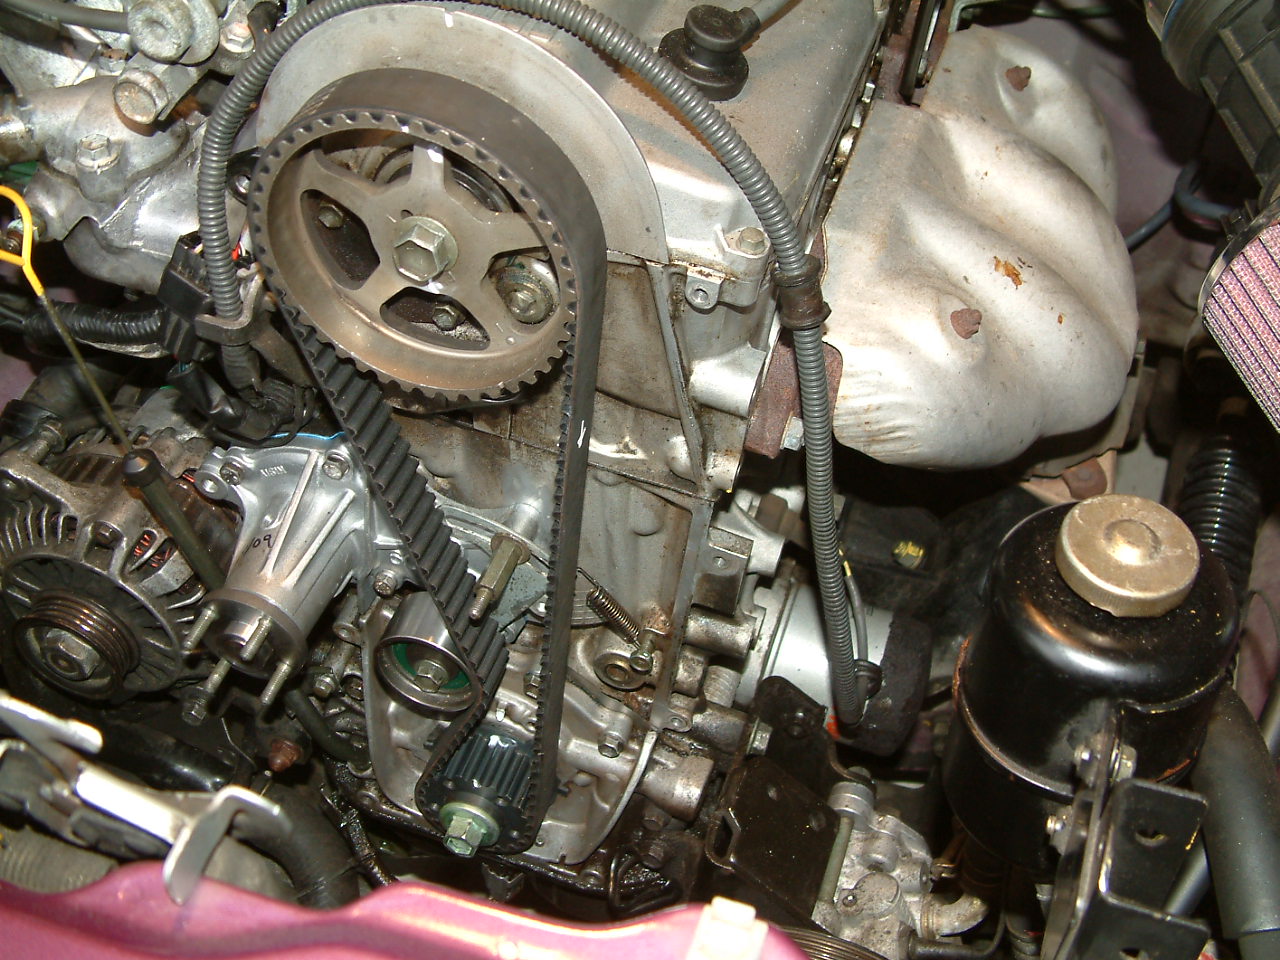
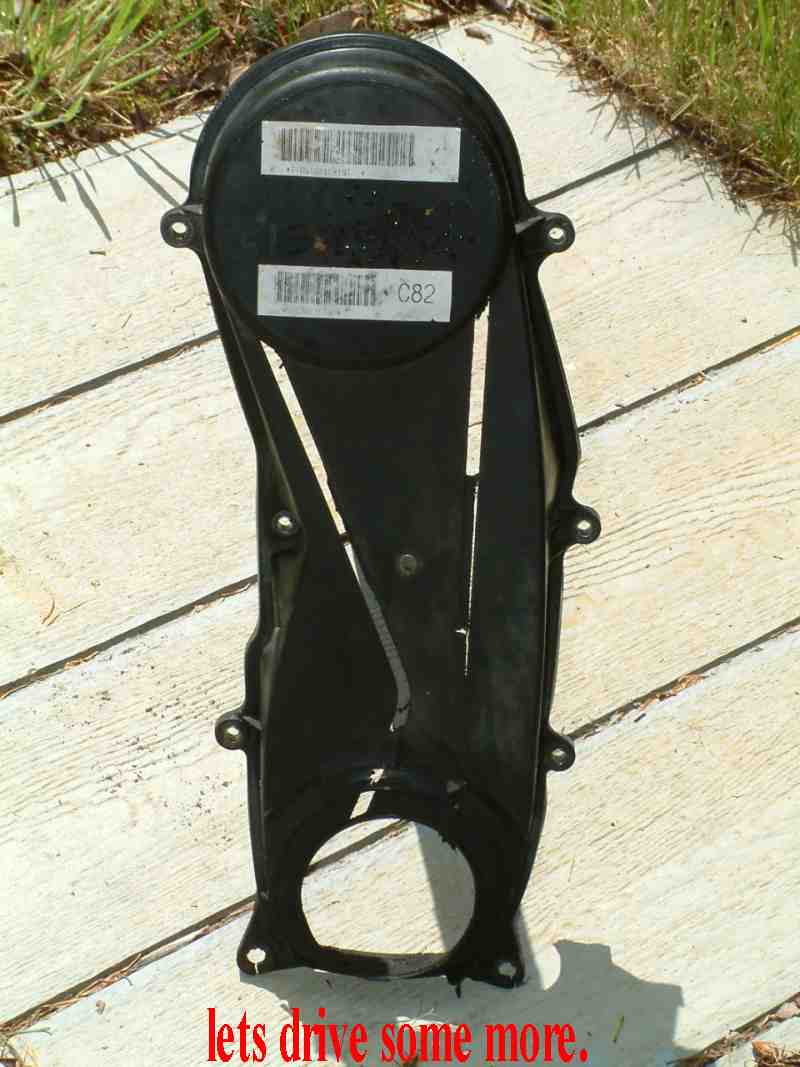
On many cars, a water pump failure can the
timing belt by cutting through the cover and hitting it.
On Side kicks , I've
seen the main water pump bearing, so bad, that the pulley flopped side to side,
cutting through the front cover
and destroying the timing belt. (takes
serious ignorance, to drive any car with a bad screaming water pump ,
huh?)All belts fail for 1 reason,
the owner did not do the 60,000 mile mandatory service. (pump not wailing
away.)
FAIL ?
Many things that cause this (my) Timing belt
proceedure to fail, or just seems too:
There are a huge list of
things that will make the new belt seem to fail , a huge list of engine
failures, or EFI issues.
If you motor, now has 170PSI compression cold (I
always do this, after this procedure), then you didn't mess up cam
timing..
PIT-FALLS: (in order of popularity
:
- Thinking? (stop that) that the cam is timed at #1 cylinder firing, NO, IT IS NOT, it is timed
to #4 firing...
- Reversing the belts after running them or turning them inside out , (don't
let kids play with the belt, or Rex the dog.)
- Not indexing the Idler base lever plate TANG (tabs) as seen in warning 31 above. see parts 5
and 7 in Drawing here.
- Not replacing belt every 60k miles (60,000) read the operators guide, this
is all covered there.
- Not inspecting crank key for damage or using the new TSB spec for the big
bolt, revised in 1996 and is (94ft/lbs) (covers
all years 89-98)
- Not torquing the big 17mm crank bolt with flywheel locked.
- Using the false marks for KEY or Timing (see photo above)
- Not replacing missing or obviously damaged parts, Suzuki still sells all
these parts.
- Not inspecting crank key way for damage, at least 1 time , at first day of
car owner ship. (then set it up right with proper torque and locktite)
- Not doing the sneak-a-peak and acid tests,
when all 4 cylinders are low
compression.
end.
LAST
, do the Distributor timing.
rev5------- 9-/5-2010 (major edit).
All Text/html , COPYRIGHT © 2007- 7/23/2015 , FixKick.com |


 Ouch, click to
zoom
Ouch, click to
zoom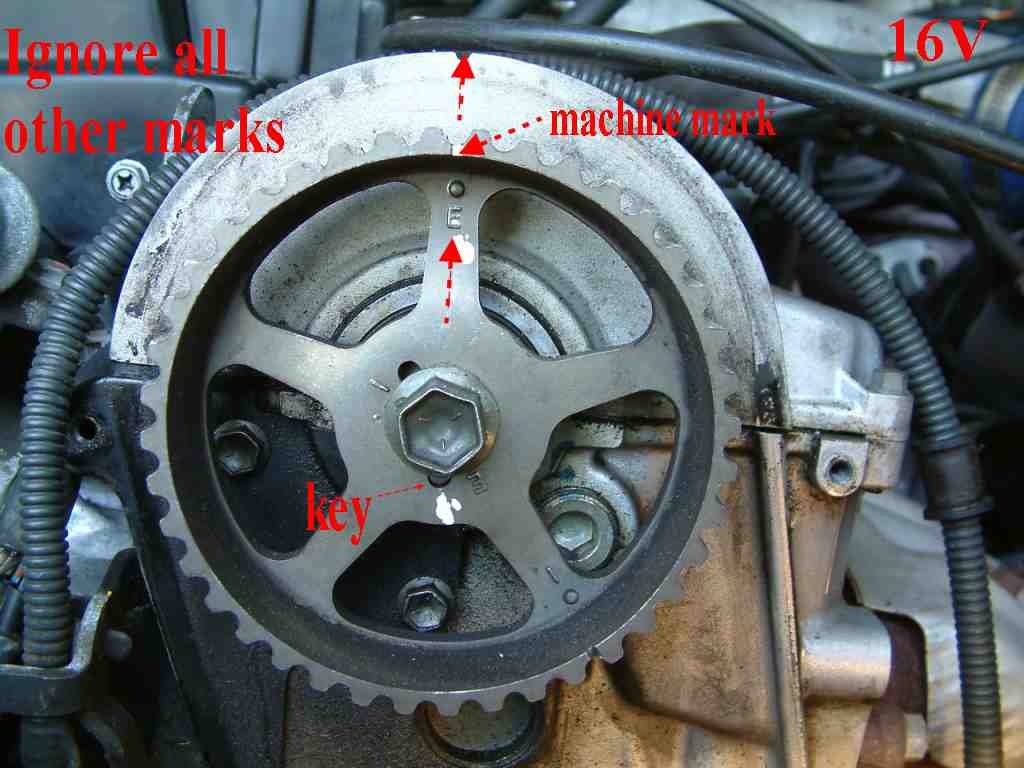
 click to see on cam photo.